This is an old revision of the document!
Warning: Trying to access array offset on null in /home/especiais/epsatisep/public_html/2017/EPS2017-wiki1/lib/plugins/caption/syntax/reference.php on line 68
Warning: Undefined array key "fsketch1" in /home/especiais/epsatisep/public_html/2017/EPS2017-wiki1/lib/plugins/caption/syntax/reference.php on line 68
Warning: Undefined array key "fsketch2" in /home/especiais/epsatisep/public_html/2017/EPS2017-wiki1/lib/plugins/caption/syntax/reference.php on line 68
Warning: Undefined array key "fcard1" in /home/especiais/epsatisep/public_html/2017/EPS2017-wiki1/lib/plugins/caption/syntax/reference.php on line 68
Warning: Undefined array key "fcard2" in /home/especiais/epsatisep/public_html/2017/EPS2017-wiki1/lib/plugins/caption/syntax/reference.php on line 68
Warning: Undefined array key "fcard3" in /home/especiais/epsatisep/public_html/2017/EPS2017-wiki1/lib/plugins/caption/syntax/reference.php on line 68
Warning: Undefined array key "f3d1" in /home/especiais/epsatisep/public_html/2017/EPS2017-wiki1/lib/plugins/caption/syntax/reference.php on line 68
Warning: Undefined array key "f3d2" in /home/especiais/epsatisep/public_html/2017/EPS2017-wiki1/lib/plugins/caption/syntax/reference.php on line 68
Warning: Undefined array key "fcover" in /home/especiais/epsatisep/public_html/2017/EPS2017-wiki1/lib/plugins/caption/syntax/reference.php on line 68
Warning: Undefined array key "fcolors" in /home/especiais/epsatisep/public_html/2017/EPS2017-wiki1/lib/plugins/caption/syntax/reference.php on line 68
Warning: Undefined array key "fopen" in /home/especiais/epsatisep/public_html/2017/EPS2017-wiki1/lib/plugins/caption/syntax/reference.php on line 68
Warning: Undefined array key "fcomponents" in /home/especiais/epsatisep/public_html/2017/EPS2017-wiki1/lib/plugins/caption/syntax/reference.php on line 68
Warning: Undefined array key "ffinal" in /home/especiais/epsatisep/public_html/2017/EPS2017-wiki1/lib/plugins/caption/syntax/reference.php on line 68
Warning: Undefined array key "f3d6" in /home/especiais/epsatisep/public_html/2017/EPS2017-wiki1/lib/plugins/caption/syntax/reference.php on line 68
Warning: Undefined array key "f3d3" in /home/especiais/epsatisep/public_html/2017/EPS2017-wiki1/lib/plugins/caption/syntax/reference.php on line 68
Warning: Undefined array key "f3d4" in /home/especiais/epsatisep/public_html/2017/EPS2017-wiki1/lib/plugins/caption/syntax/reference.php on line 68
Warning: Undefined array key "f3d5" in /home/especiais/epsatisep/public_html/2017/EPS2017-wiki1/lib/plugins/caption/syntax/reference.php on line 68
Warning: Undefined array key "tmicroc" in /home/especiais/epsatisep/public_html/2017/EPS2017-wiki1/lib/plugins/caption/syntax/reference.php on line 68
Warning: Undefined array key "tsensor1" in /home/especiais/epsatisep/public_html/2017/EPS2017-wiki1/lib/plugins/caption/syntax/reference.php on line 68
Warning: Undefined array key "tsensor2" in /home/especiais/epsatisep/public_html/2017/EPS2017-wiki1/lib/plugins/caption/syntax/reference.php on line 68
Warning: Undefined array key "tsensor3" in /home/especiais/epsatisep/public_html/2017/EPS2017-wiki1/lib/plugins/caption/syntax/reference.php on line 68
Warning: Undefined array key "tsensor4" in /home/especiais/epsatisep/public_html/2017/EPS2017-wiki1/lib/plugins/caption/syntax/reference.php on line 68
Warning: Undefined array key "tsensor5" in /home/especiais/epsatisep/public_html/2017/EPS2017-wiki1/lib/plugins/caption/syntax/reference.php on line 68
Warning: Undefined array key "theating" in /home/especiais/epsatisep/public_html/2017/EPS2017-wiki1/lib/plugins/caption/syntax/reference.php on line 68
Warning: Undefined array key "tcooling" in /home/especiais/epsatisep/public_html/2017/EPS2017-wiki1/lib/plugins/caption/syntax/reference.php on line 68
Warning: Undefined array key "tLCD" in /home/especiais/epsatisep/public_html/2017/EPS2017-wiki1/lib/plugins/caption/syntax/reference.php on line 68
Warning: Undefined array key "tLight" in /home/especiais/epsatisep/public_html/2017/EPS2017-wiki1/lib/plugins/caption/syntax/reference.php on line 68
Warning: Undefined array key "tPower" in /home/especiais/epsatisep/public_html/2017/EPS2017-wiki1/lib/plugins/caption/syntax/reference.php on line 68
Warning: Undefined array key "felect" in /home/especiais/epsatisep/public_html/2017/EPS2017-wiki1/lib/plugins/caption/syntax/reference.php on line 68
Table of Contents
7. Project Development
7.1 Introduction
In this chapter, the team shows the development process of the “EscarGO”. The team will describe the architecture of the “EscarGO” with 2D and 3D drawings. The team also describe the controlling system and the system schematics to show how the connection in the product will be to make it work. Furthermore, there will be a depiction of the functionalities of the “EscarGO”. Finally, the team report all the results of the tests the team does regarding with the project requirements.
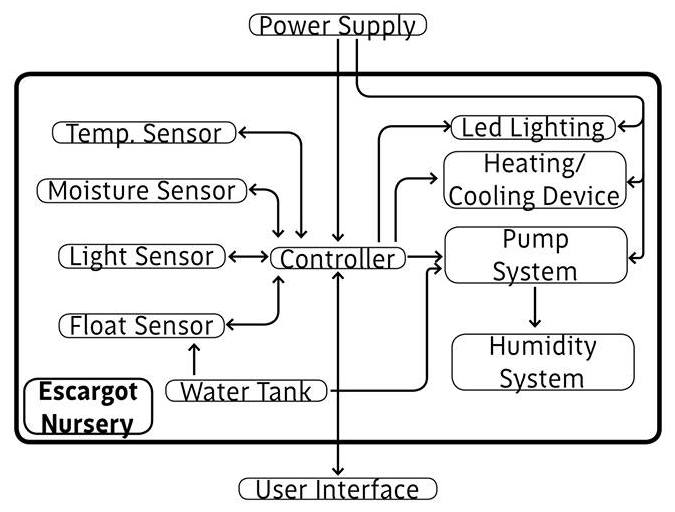
7.2 BlackBox
The BlackBox (See Figure 1) was the diagram used to describe the main functions of the Escargot Nursery in an early stage.
7.3 Architecture
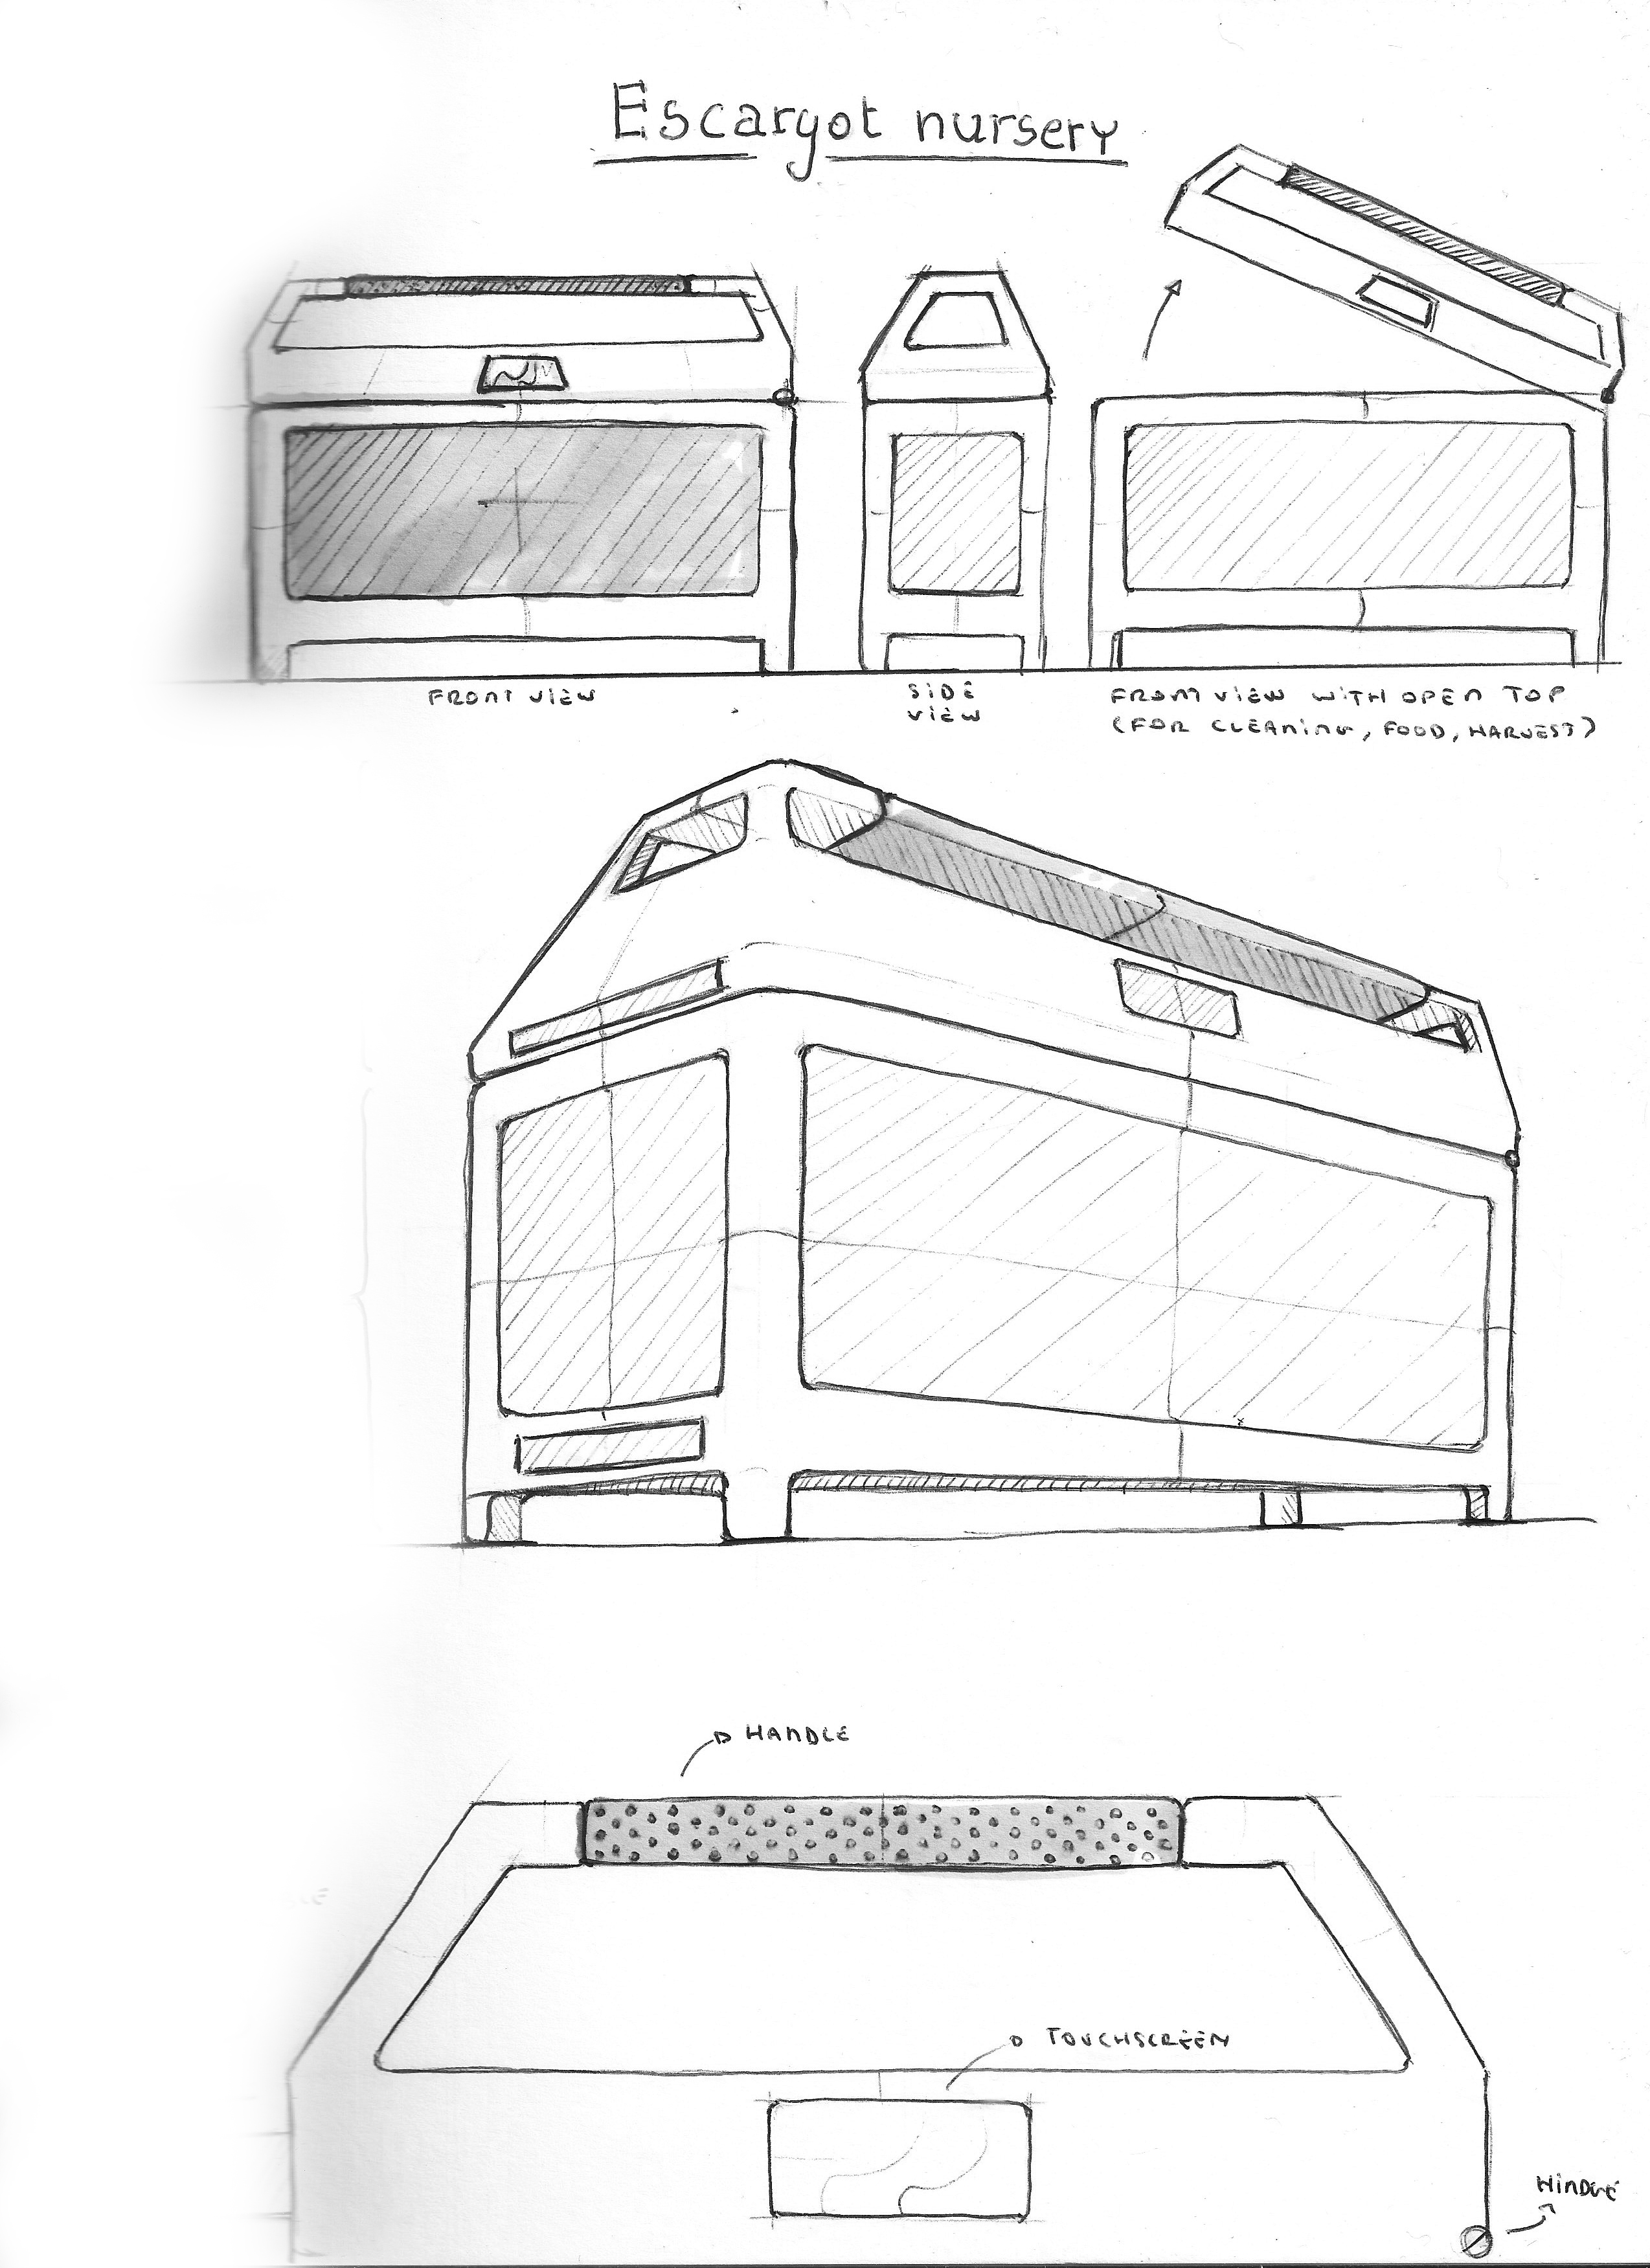
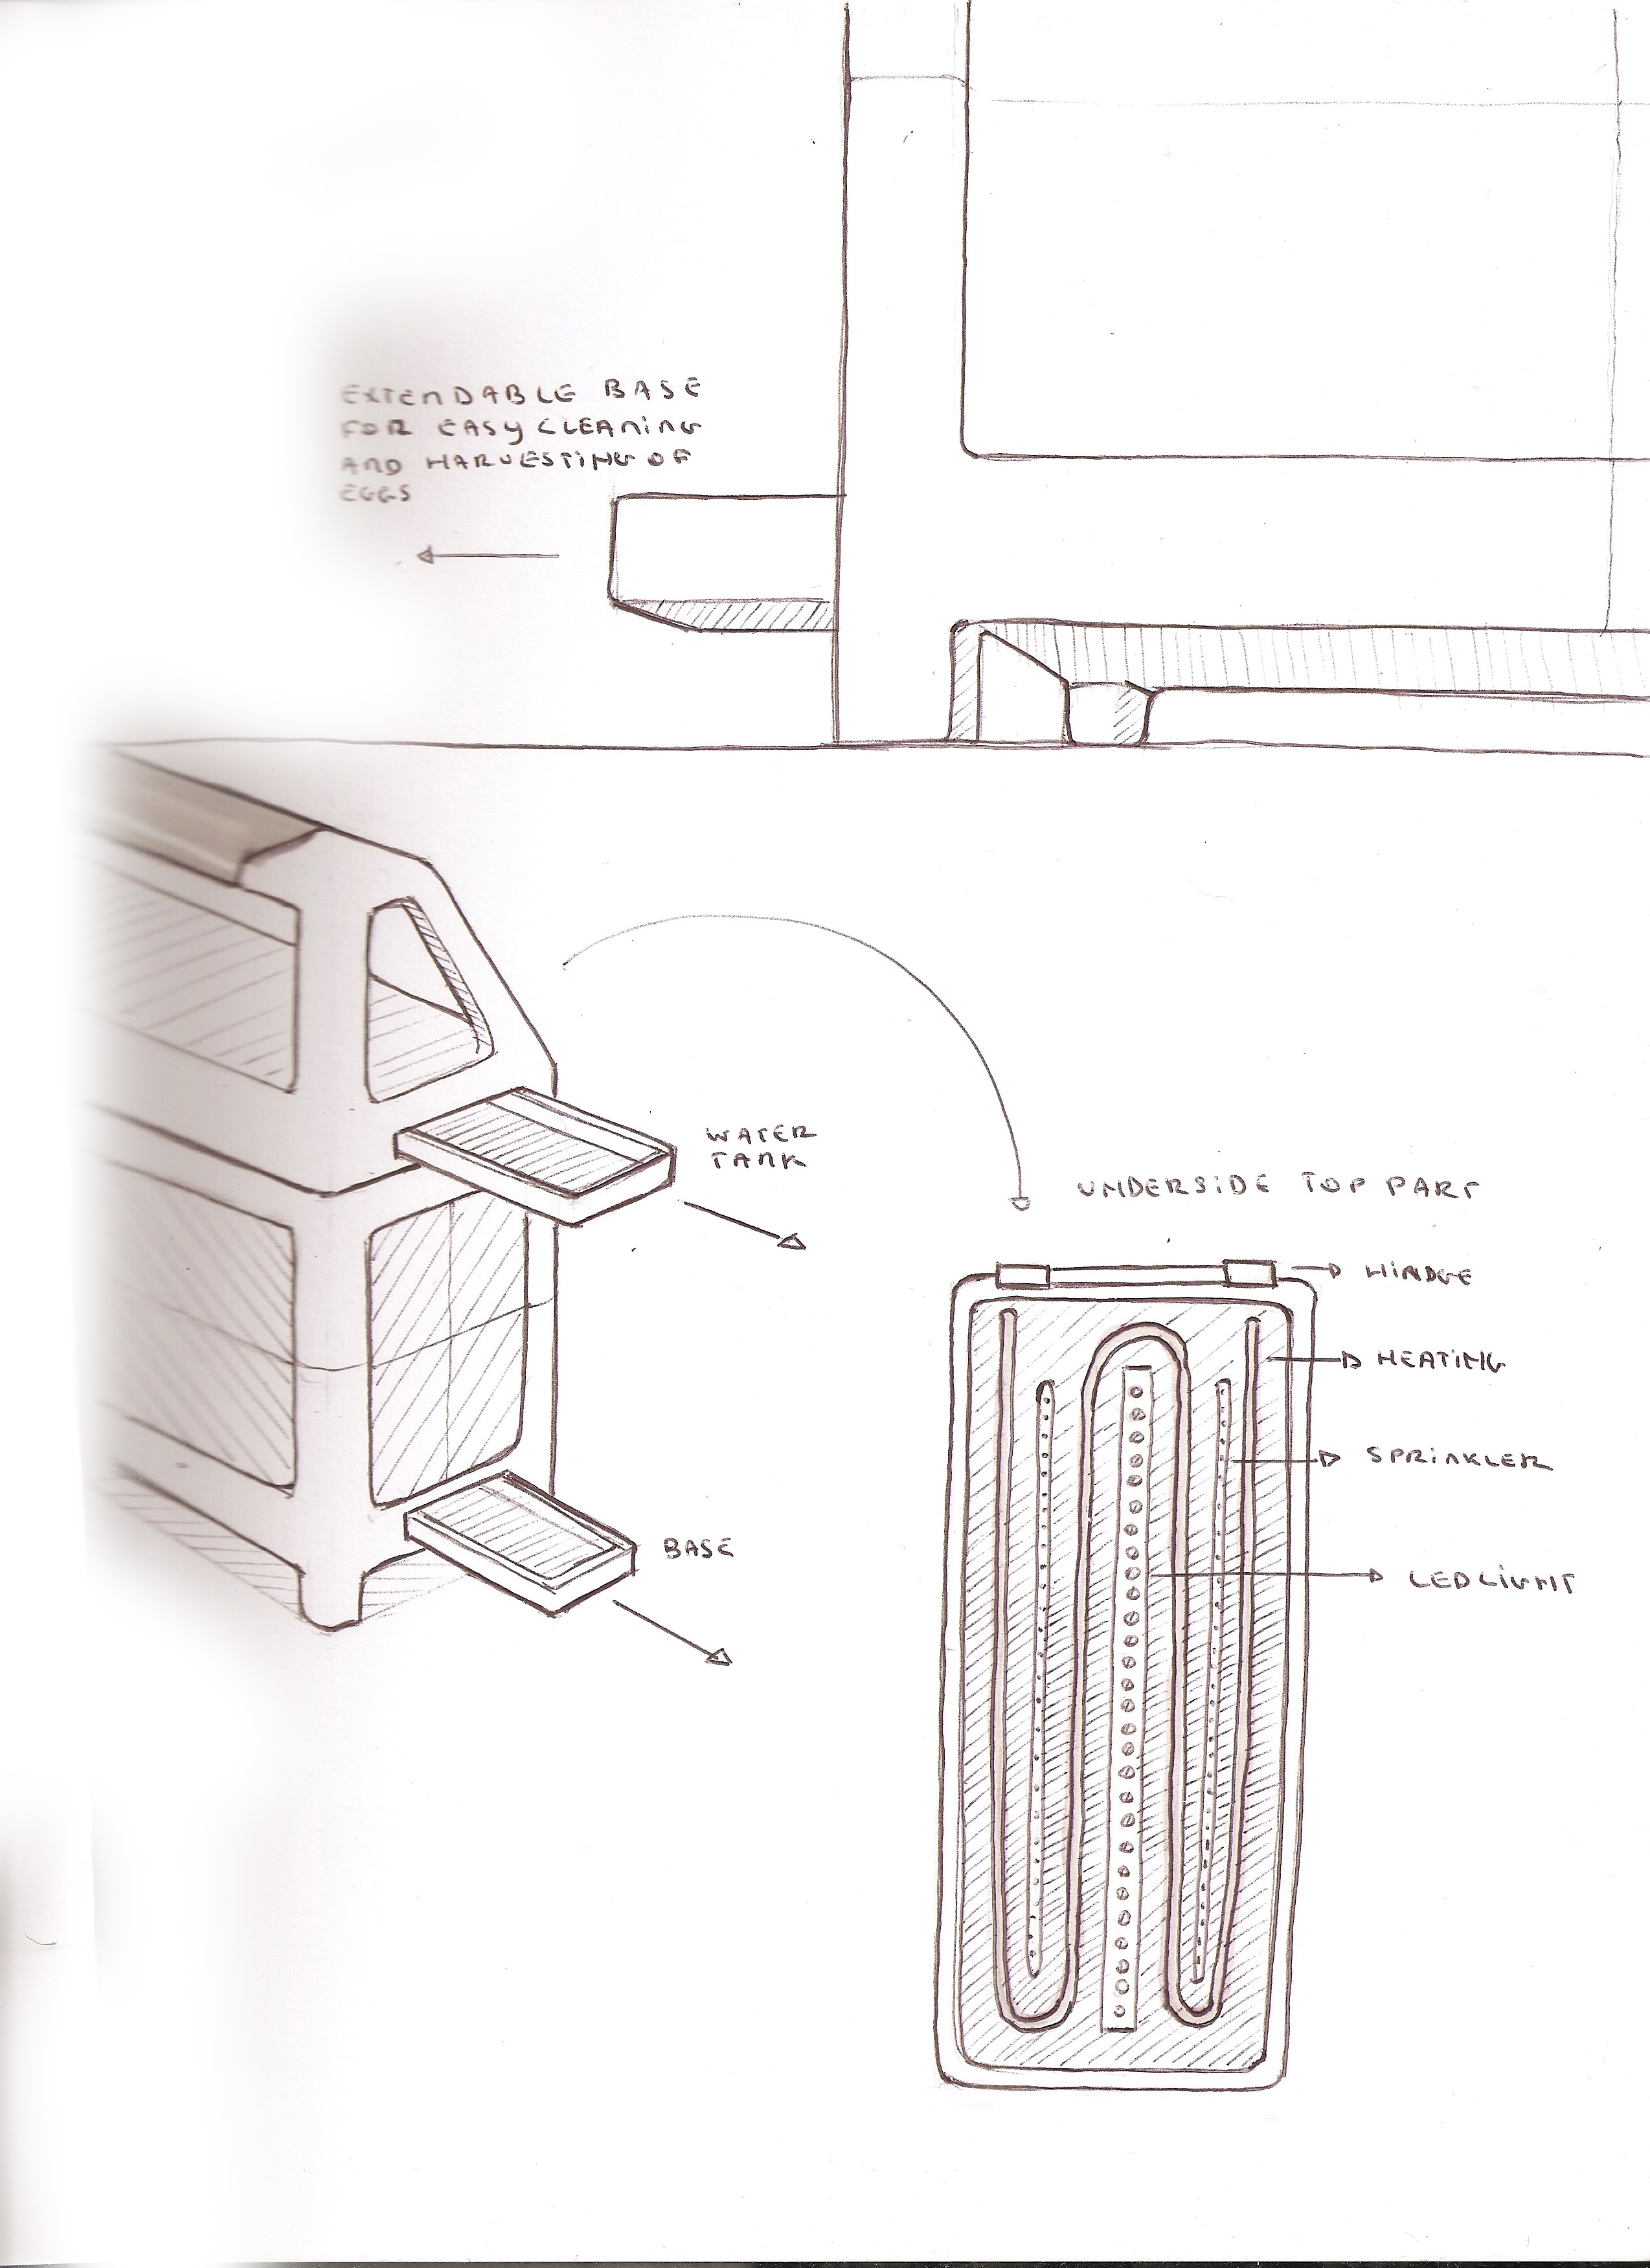
7.3.1 First Structural Drawings
Figure 2 and 3 show the first structural drawings of the “EscarGO”. These drawings were meant to be refined in a later stage, but they served as a good view of how the team wanted the Escargot Nursery to look like.
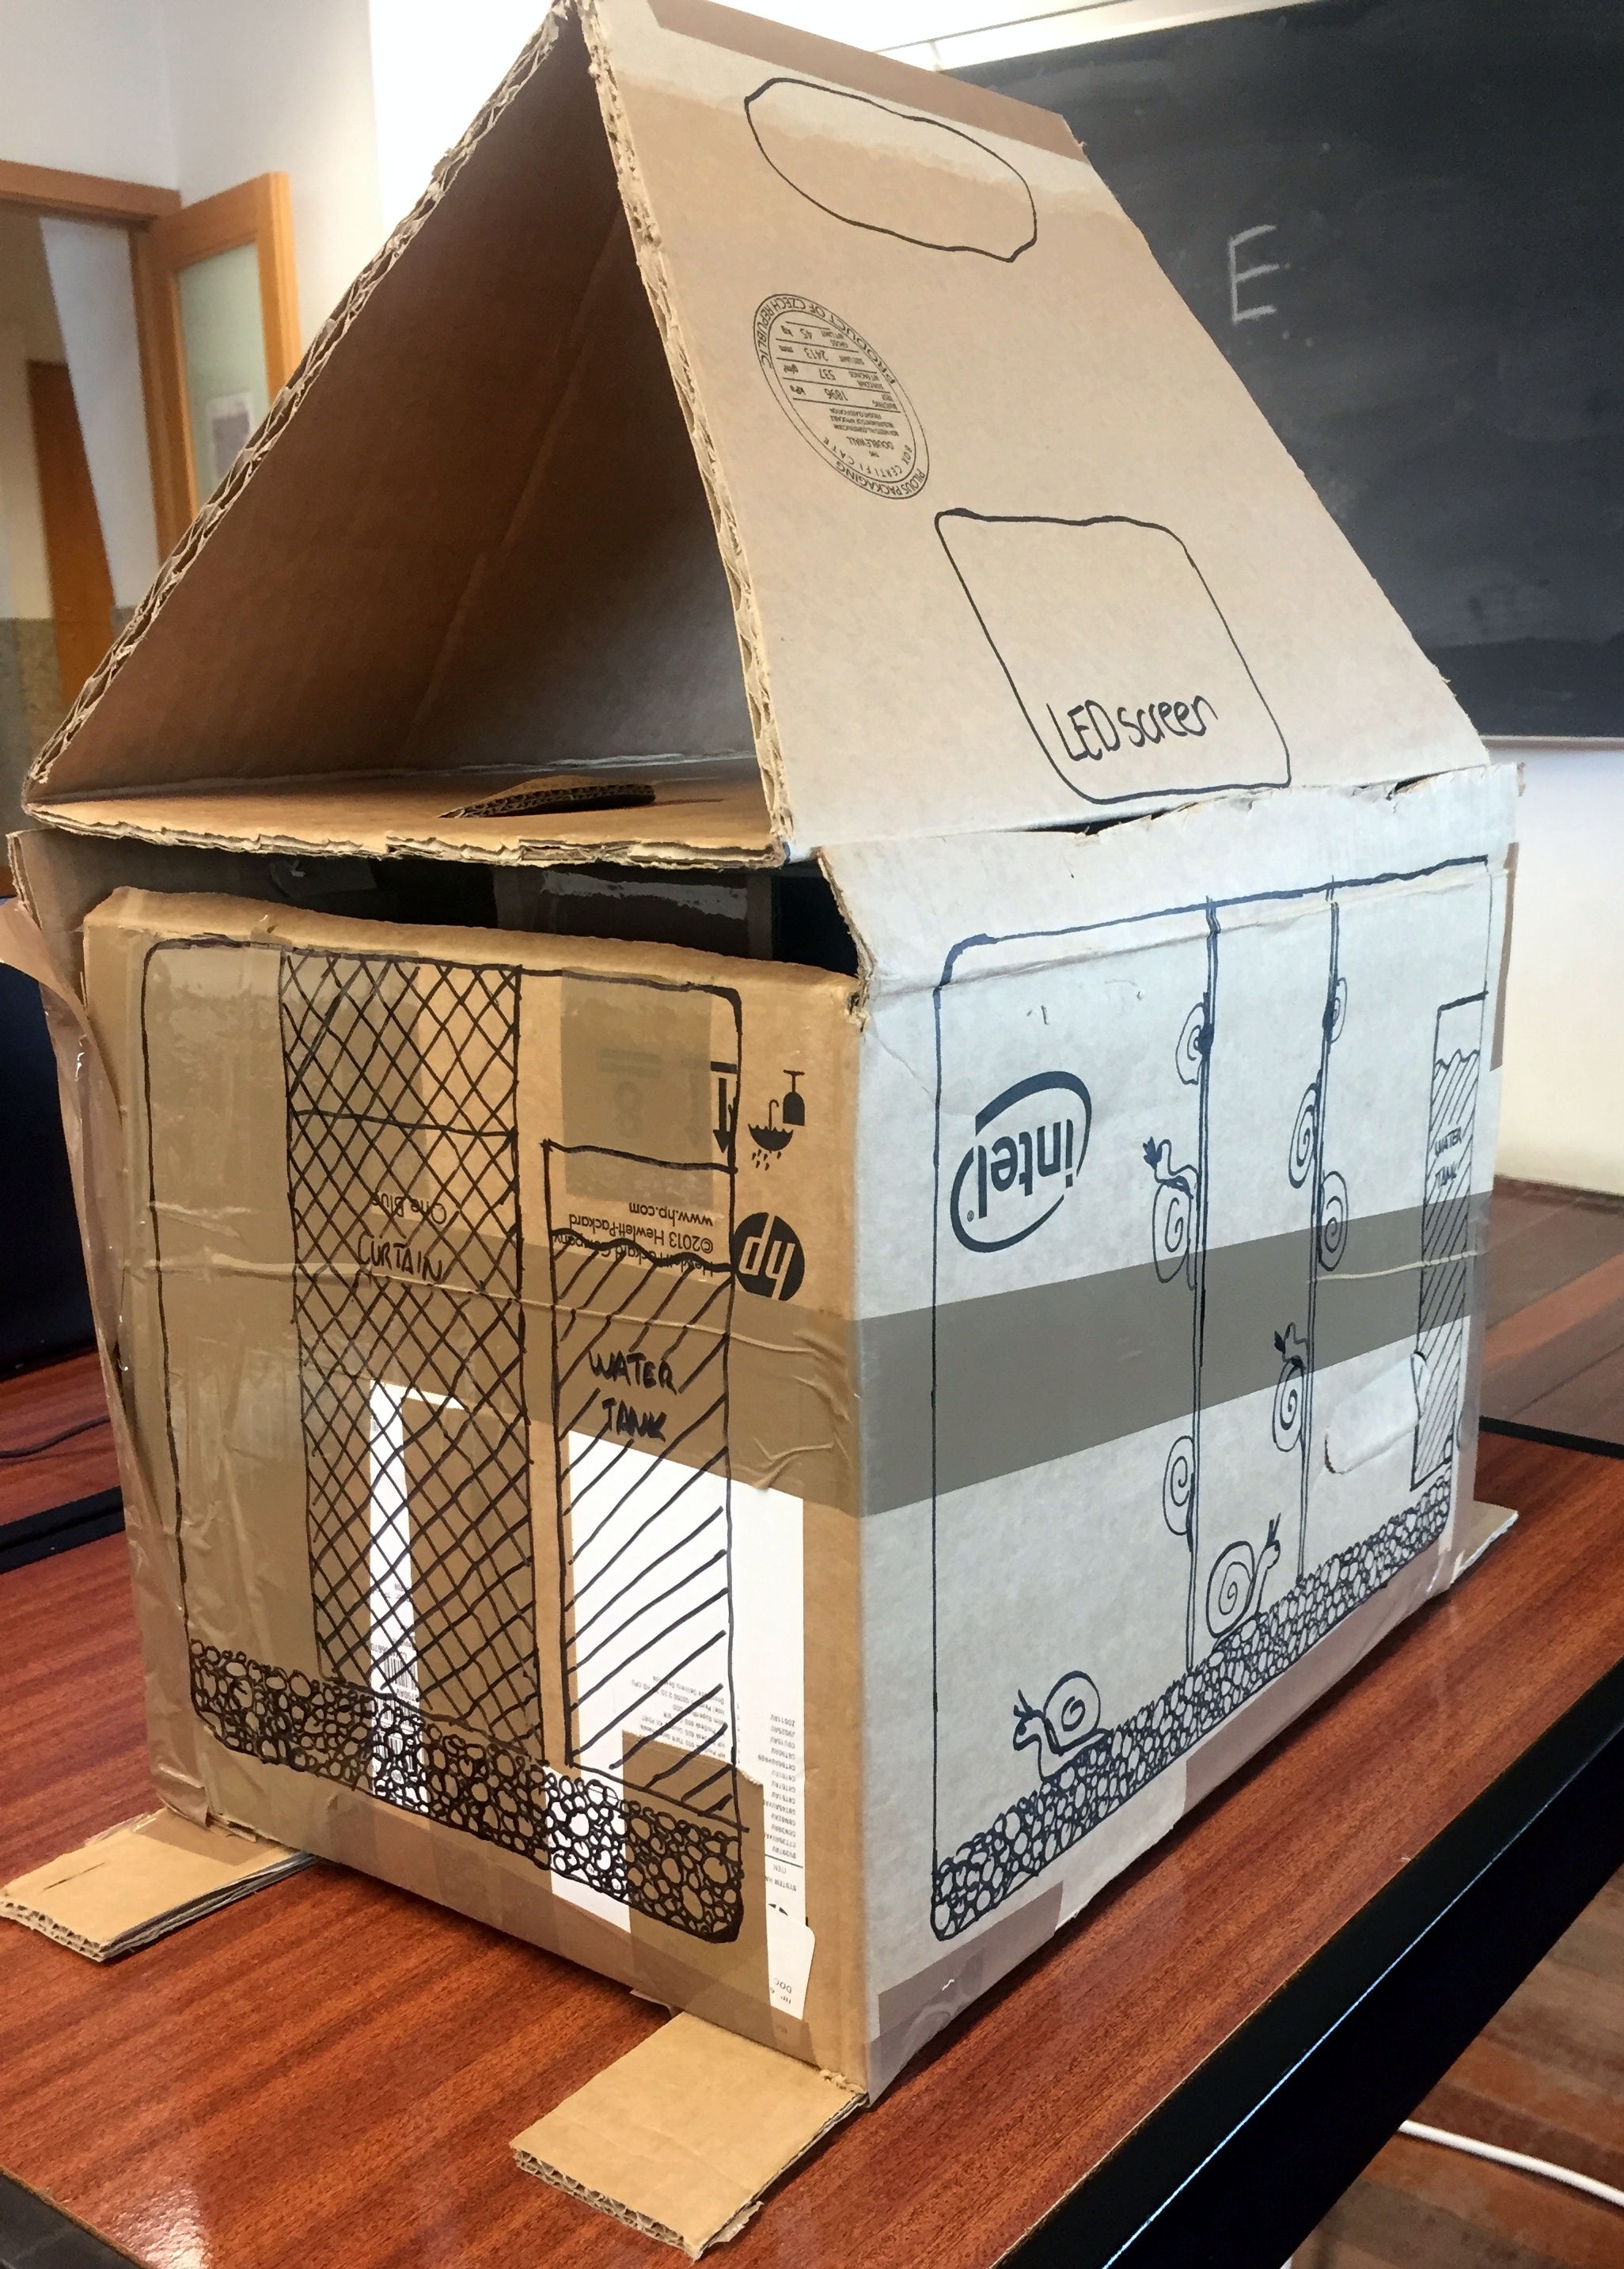
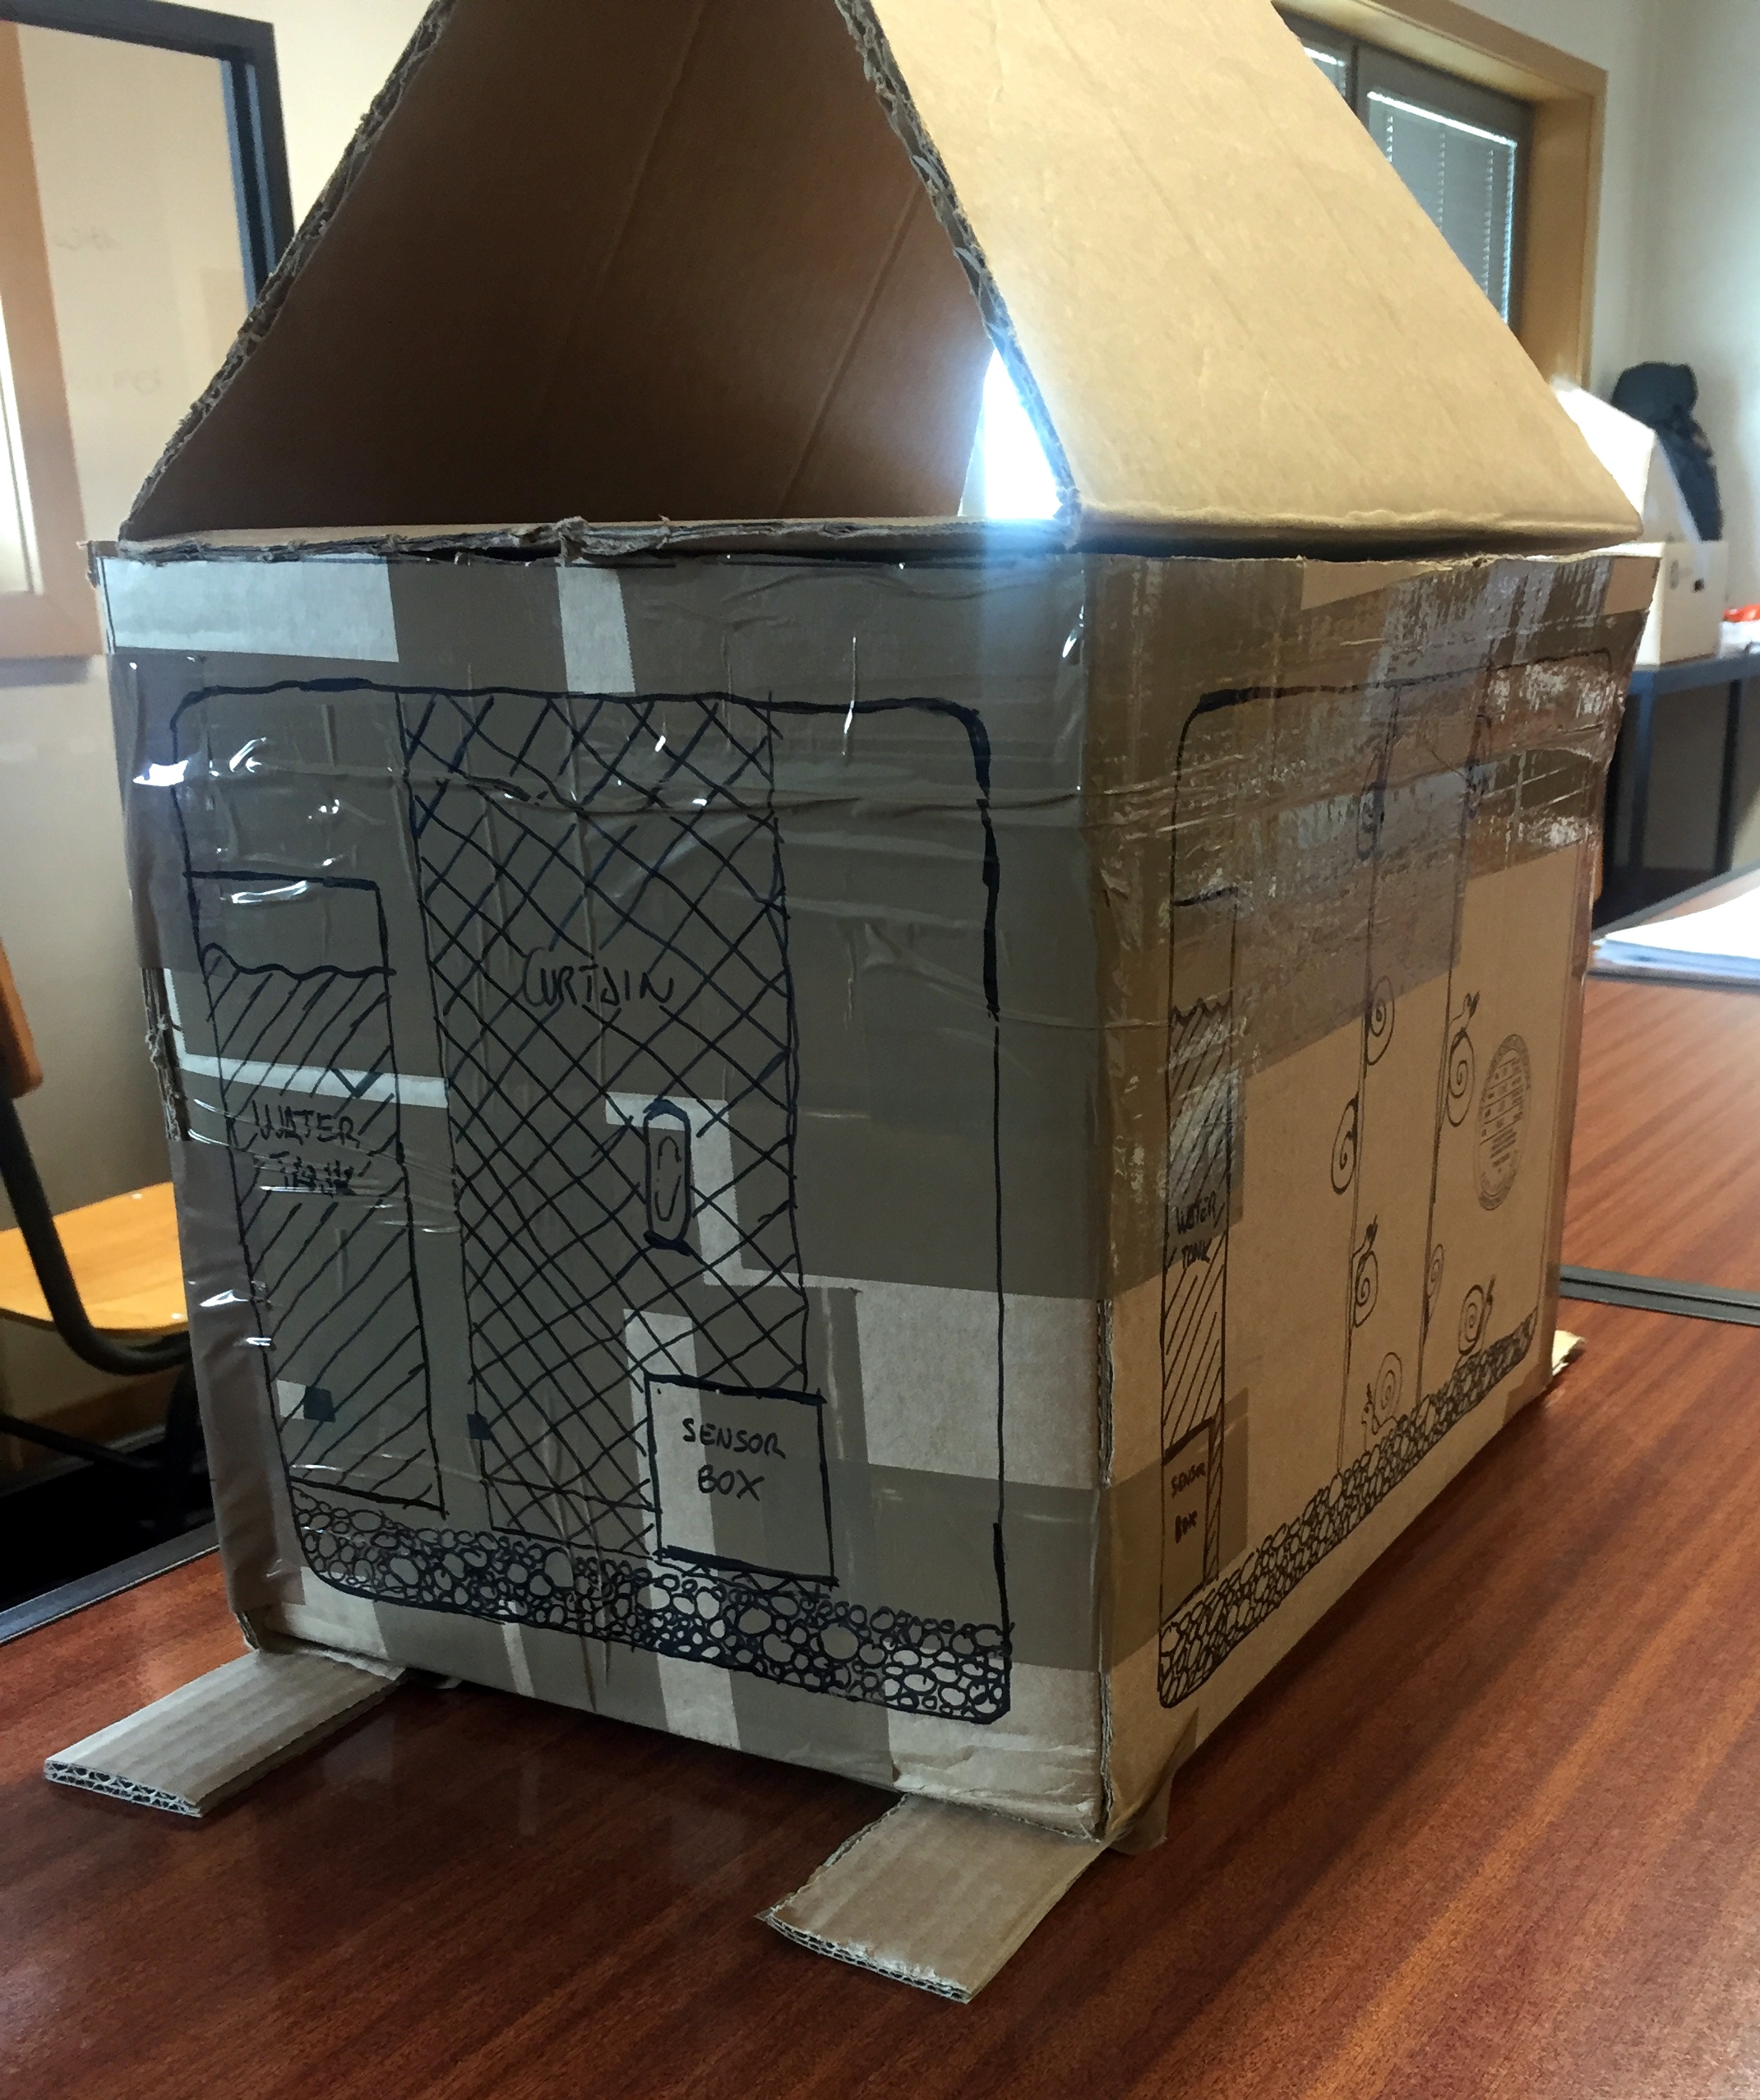
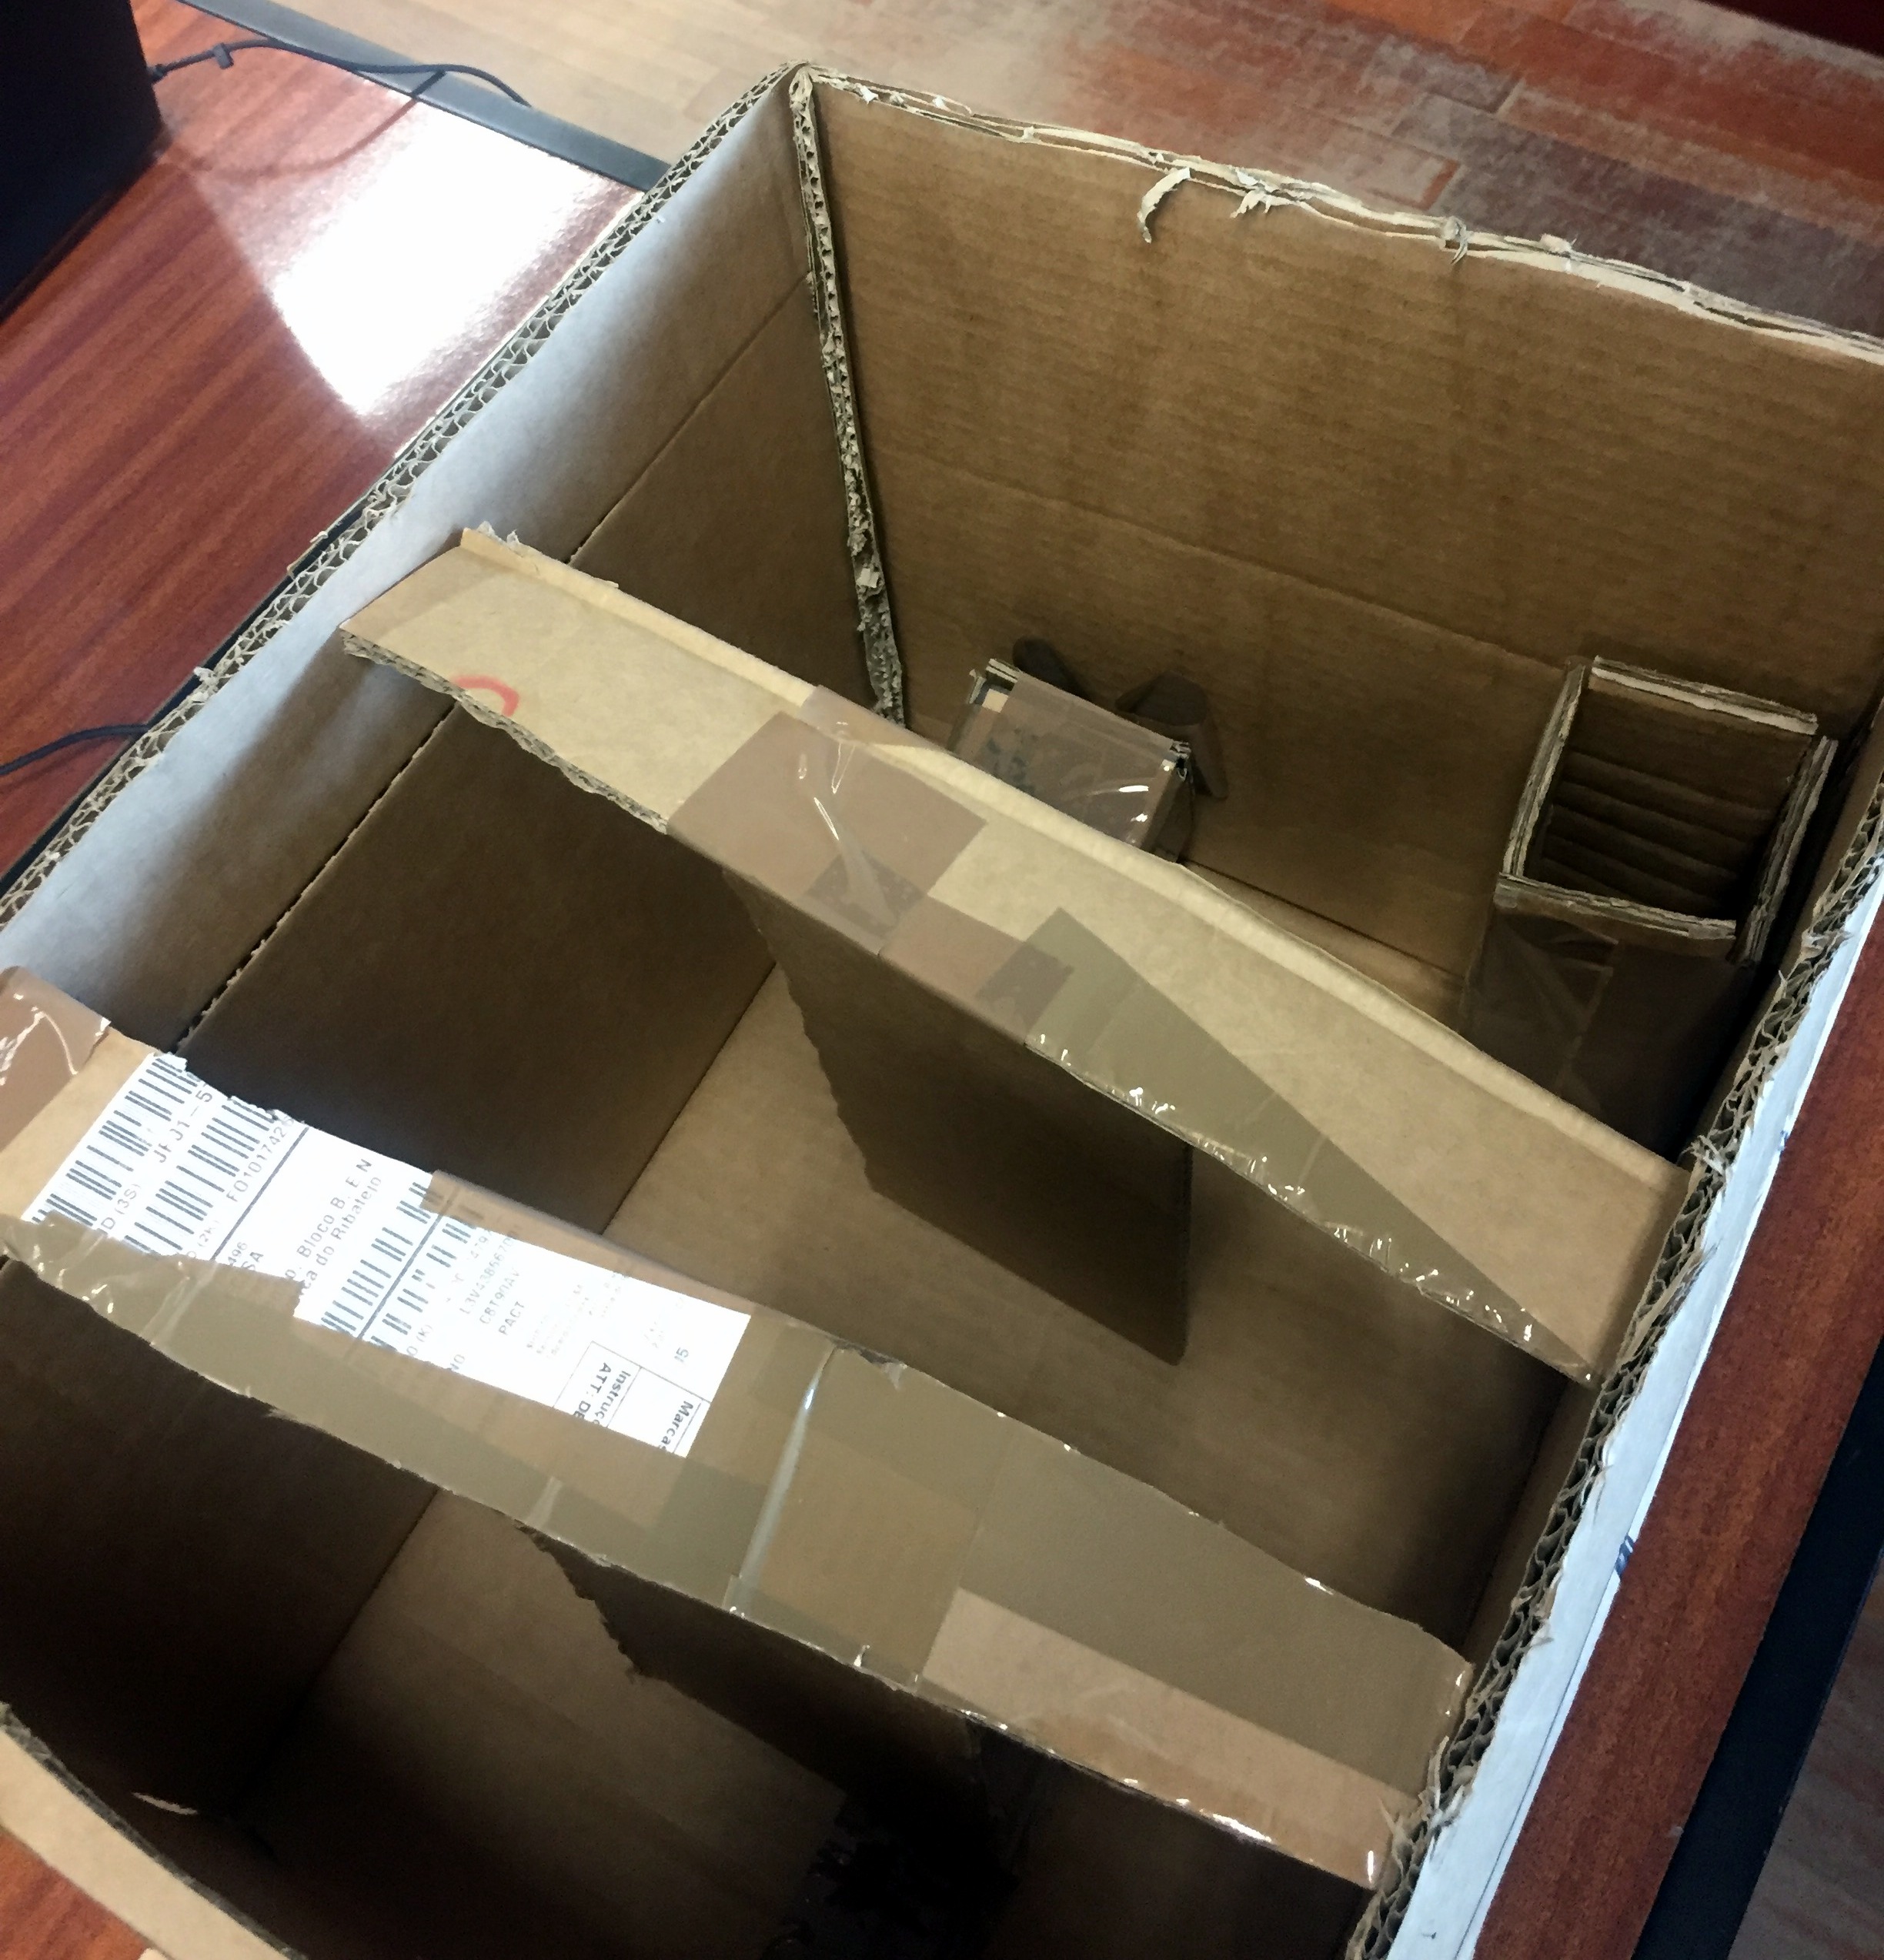
7.3.2 Cardboard Model
To begin with the architecture of the prototype, A cardboard model was made as a first approach to find out the optimal dimensions and opening system of the “EscarGO” that did not require an extra amount of free space around for its movement. The team also used it to show the curtain system. It can be seen in the following Figures 4, 5 and 6.
7.3.3 First 3D Model
The team made some first Three-Dimensional (3D) models to see how the product would be like at the end of the project.
At this stage, it was decided to remove the feet of the structure, since it did not add anything to the product, and using a plastic rubber band to keep the product from touching the furniture directly.
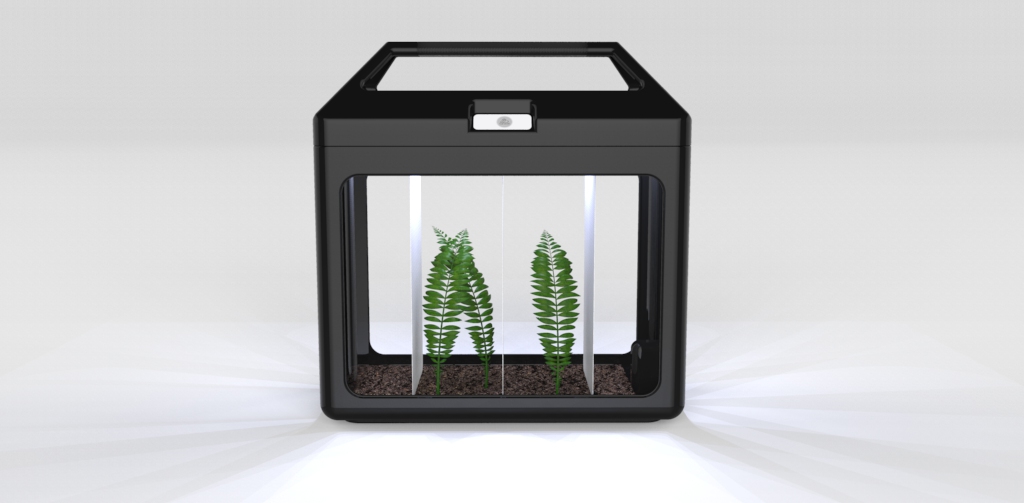
Figure 7 and Figure 8 show the front view of the product. Curtains were placed inside the cage, so that the snails could climb them increasing their living surface that way. This permitted to host a bigger number of snails in the same space, reducing the energy consumption and increasing the product's usability.

The cover is shown in Figure 9. It included a LCD-screen where the user could read the temperature and the humitity inside the “EscarGo”. There was also a handle in the cover to make the cage easy to move to another place.
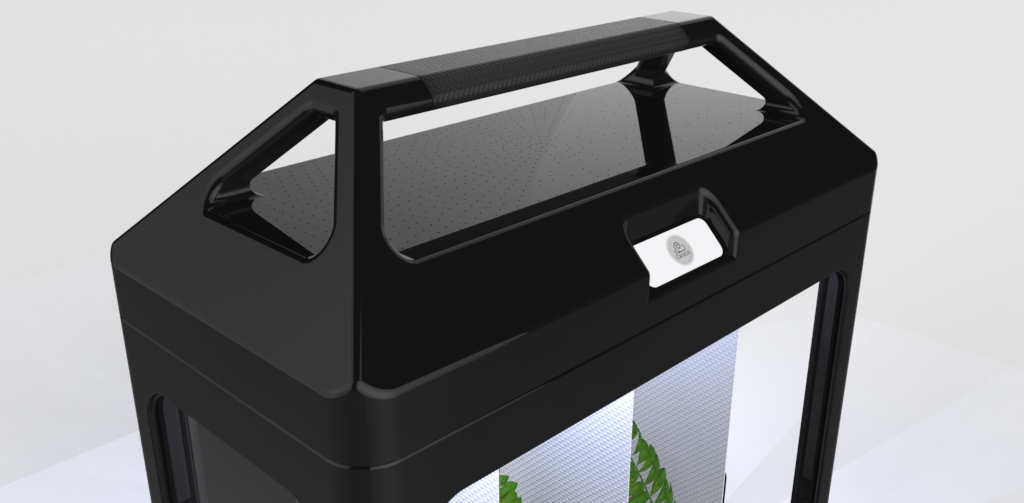
Figure 10 shows some different colours options for the cage. The team chose these coulour possibilities to make the producht more attractive for the target customers.
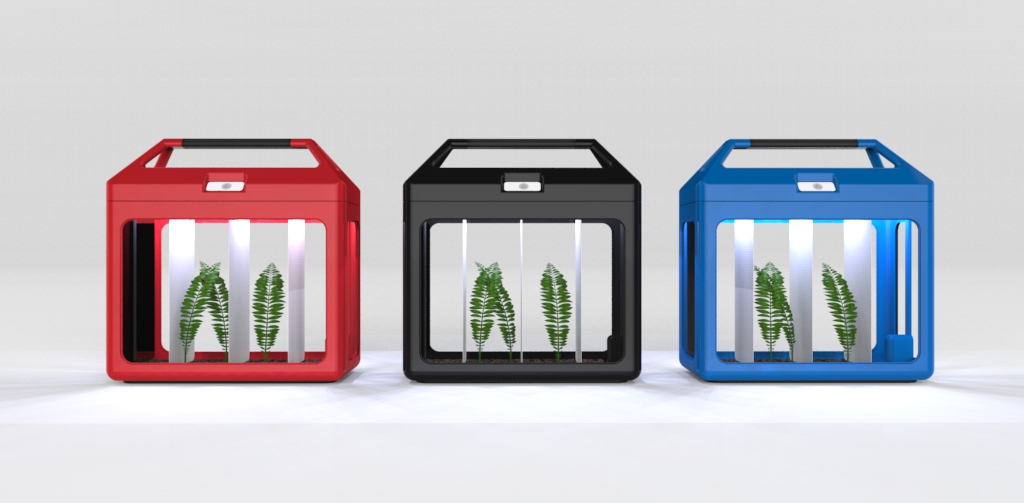
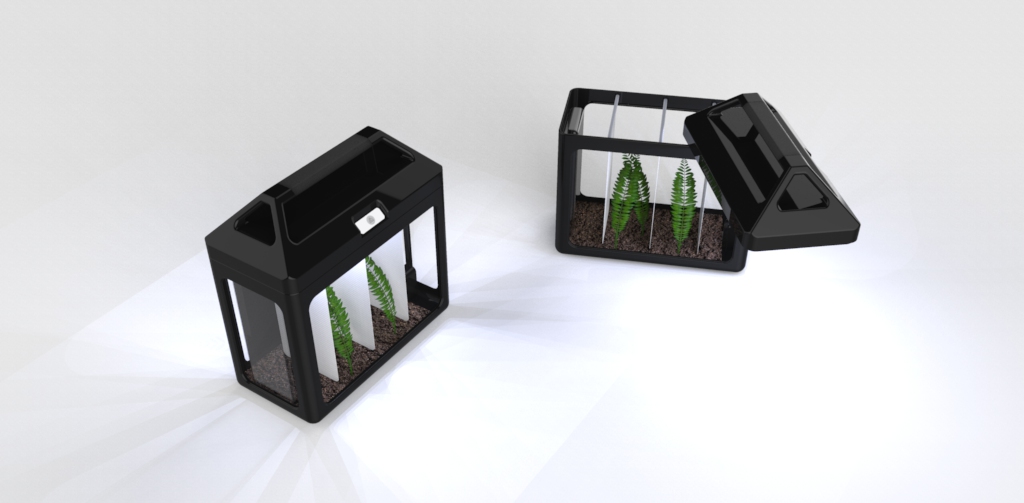
Figure 11 shows how the product was opened using a pivoting system .
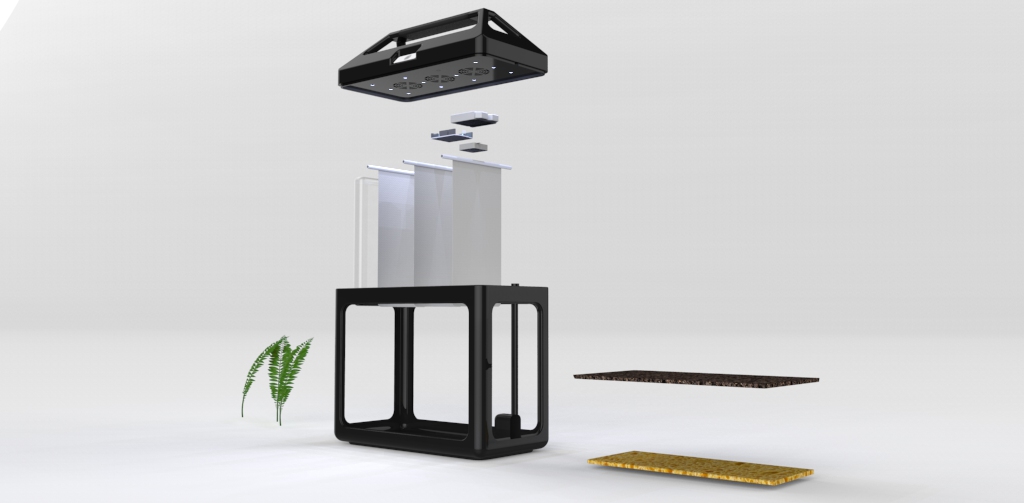
The different componets included in the product are shown in Figure 12.
7.3.4 Final Structural Drawings
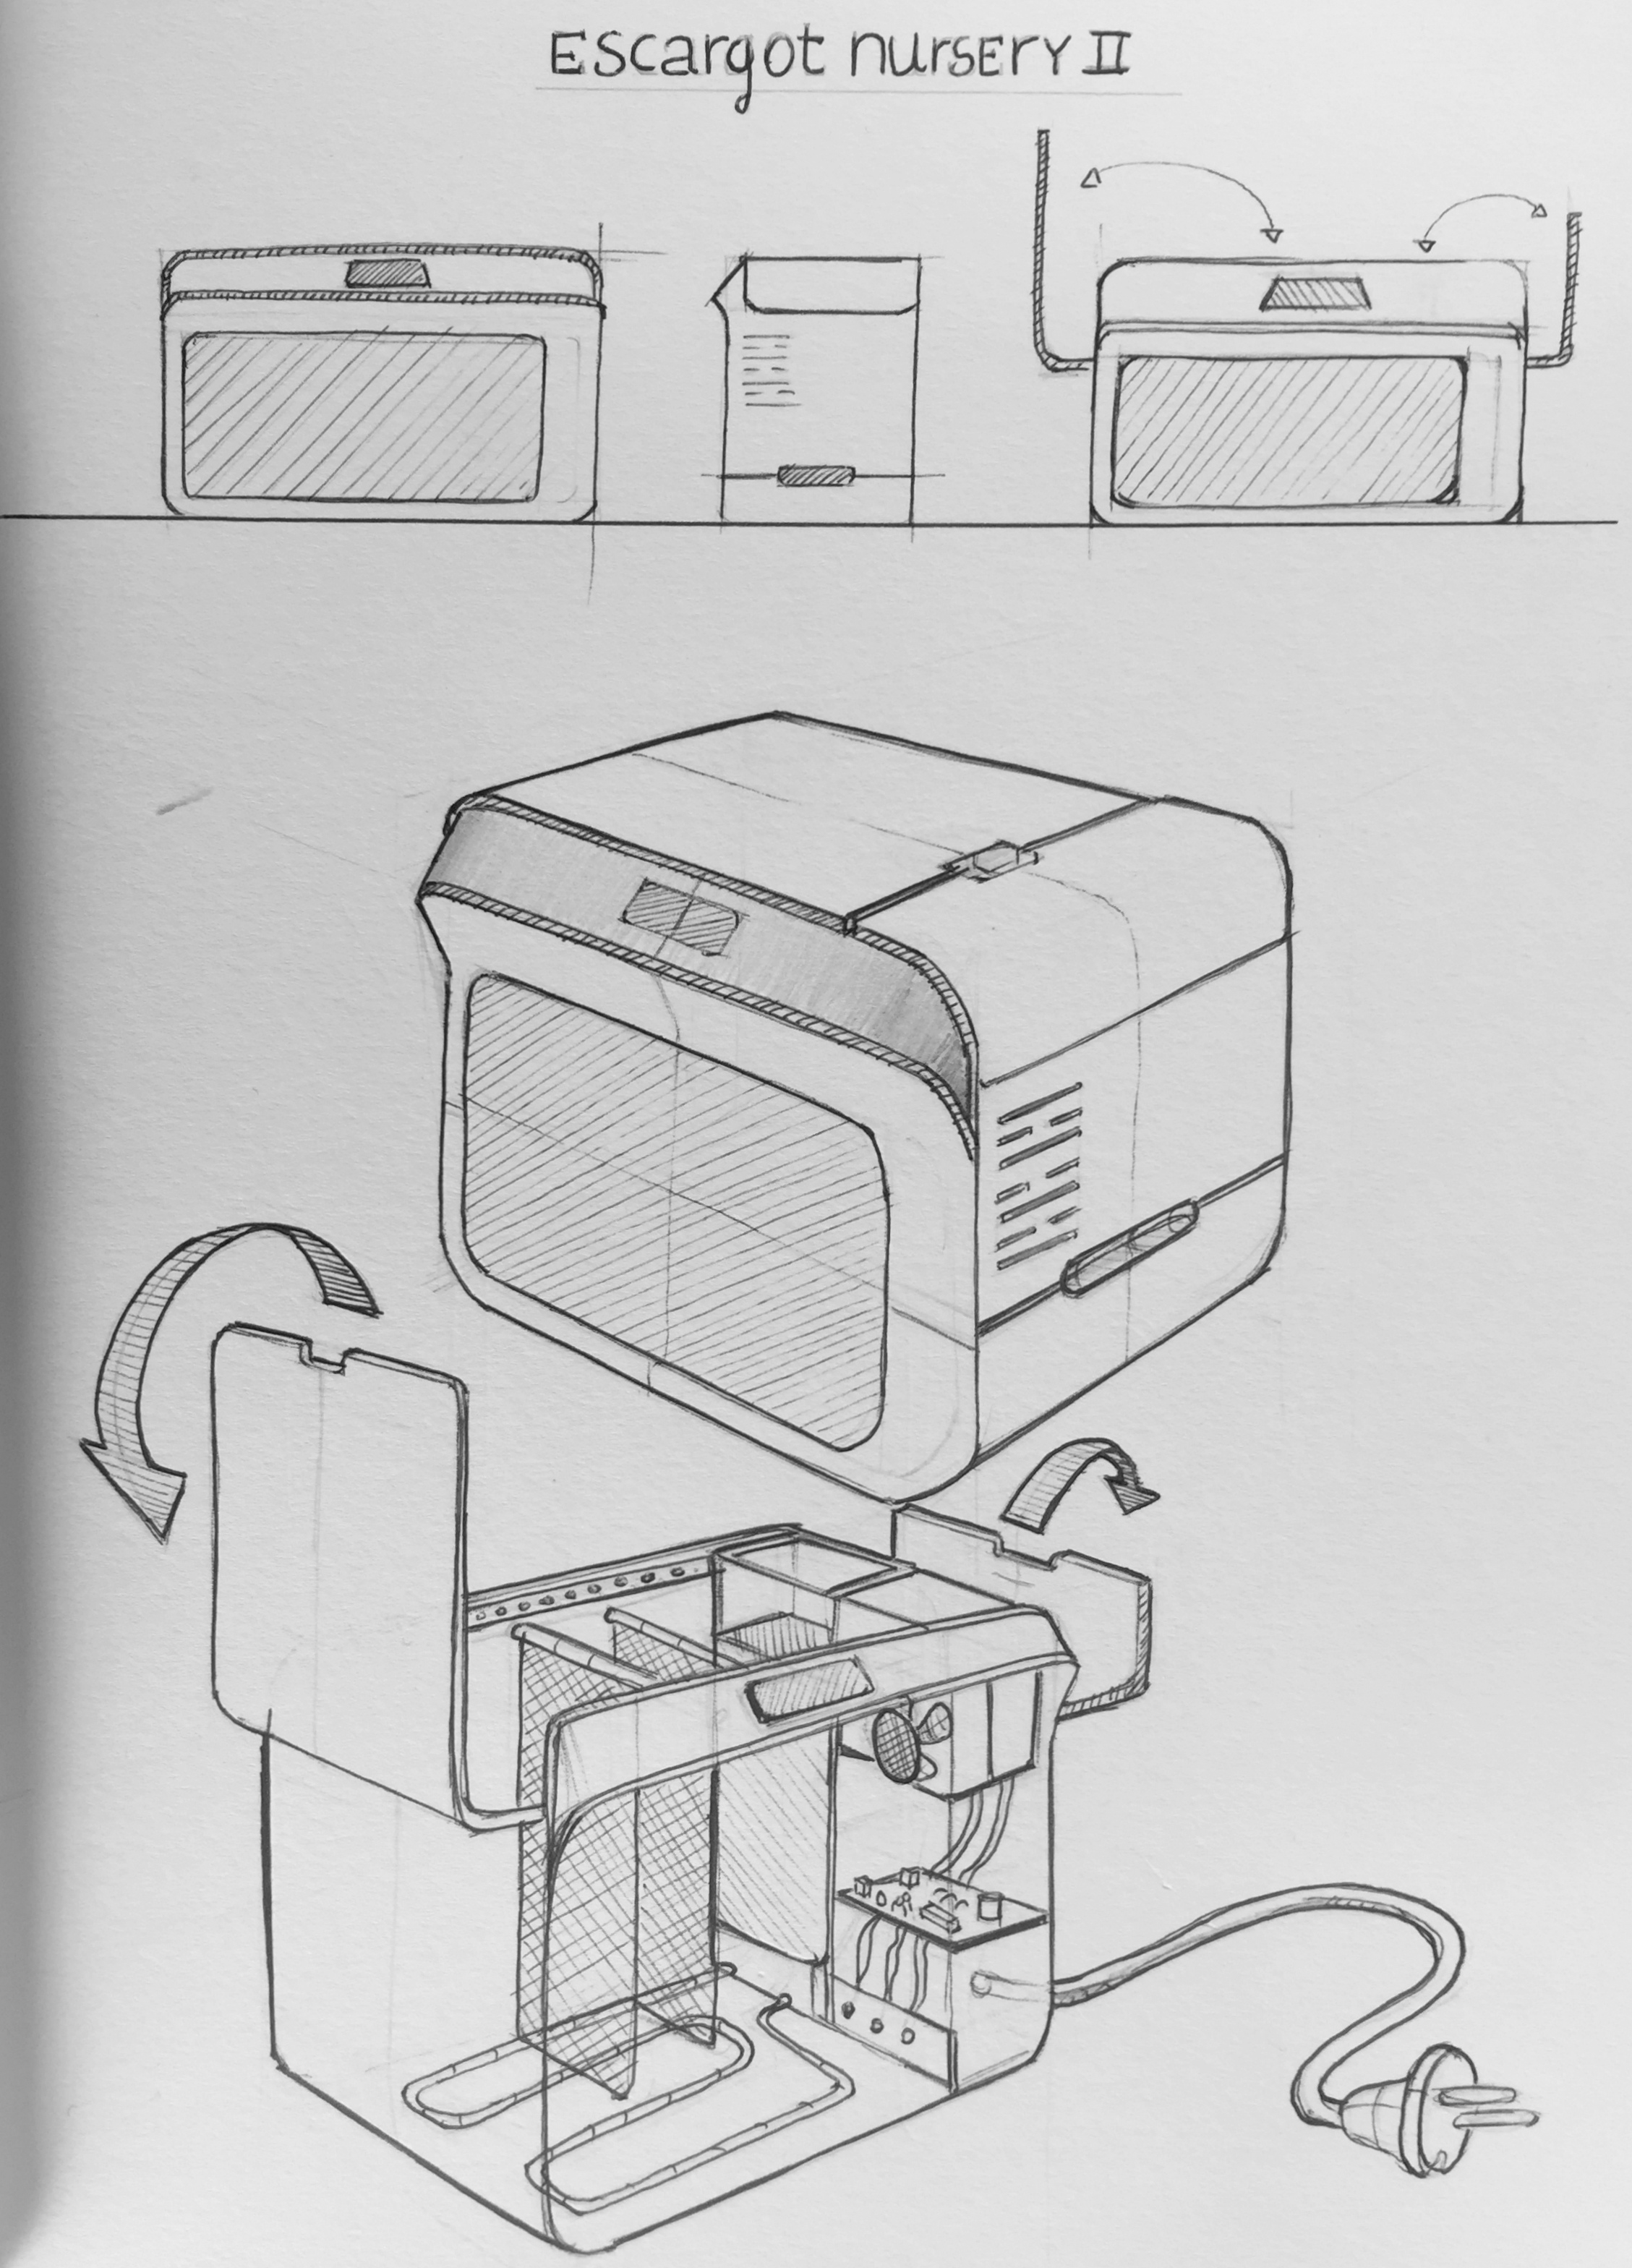
The team had to do some brainstorming in order to fix the flaws found in the first designs. The original pivotating opening system was not very likely to be long lasting, and therefore sustainable. In order to keep the cover removal simple, the group decided not to host the technologies inside the cover and add a chamfer instead for that purpose. These changes in the product (See Figure 13) were intended to make the “EscarGO” more user friendly.
7.3.5 Final 3D Model
In this sub-chapter, the final 3D models are showed. The team decided to use another technique for opening the terrarium instead of the pivoting system. The dimensions of the “EscarGO” will be 400 x 300 x 350 mm Figure 8 shows an overview of the whole product.
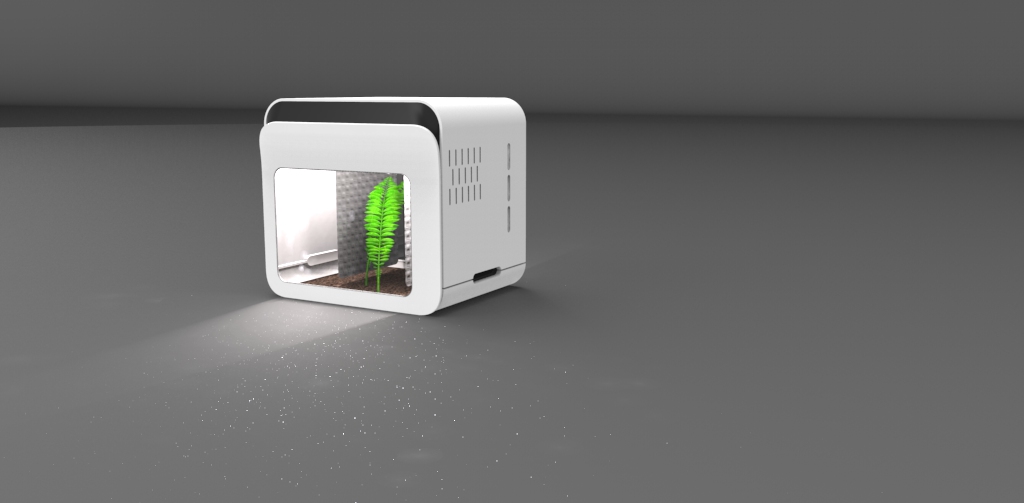
Figure 15 and 16 represent the front view of the product.
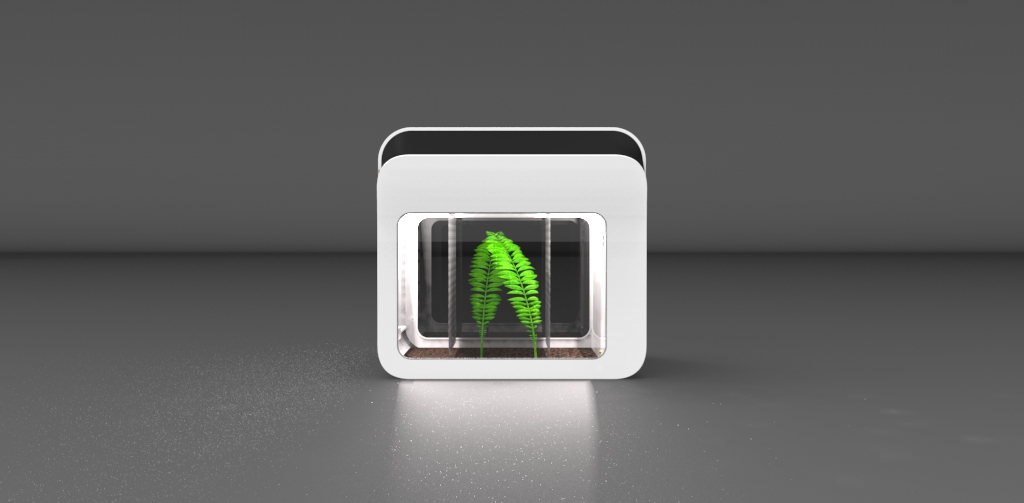
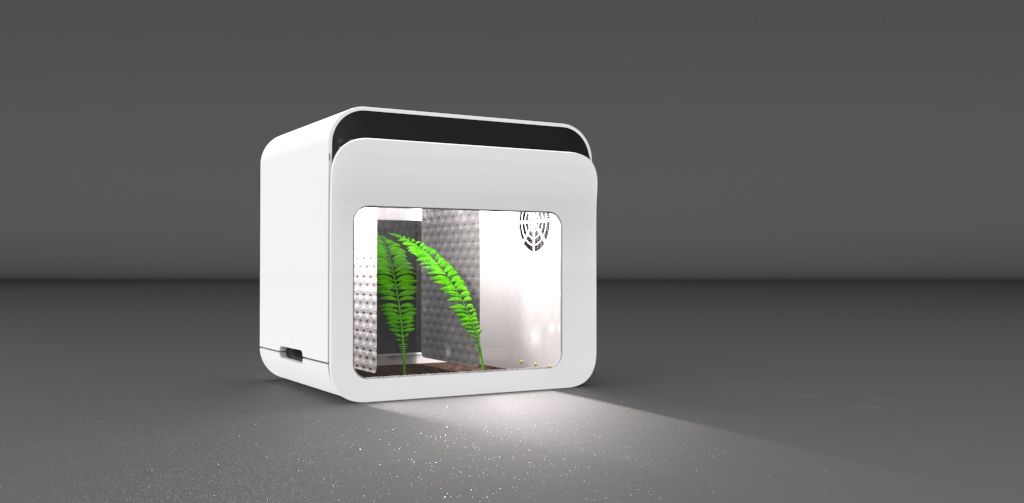
Figure 17 displays a front view and a view of some parts that will be inside the terrarium. The figure shows the curtains and the watertank.
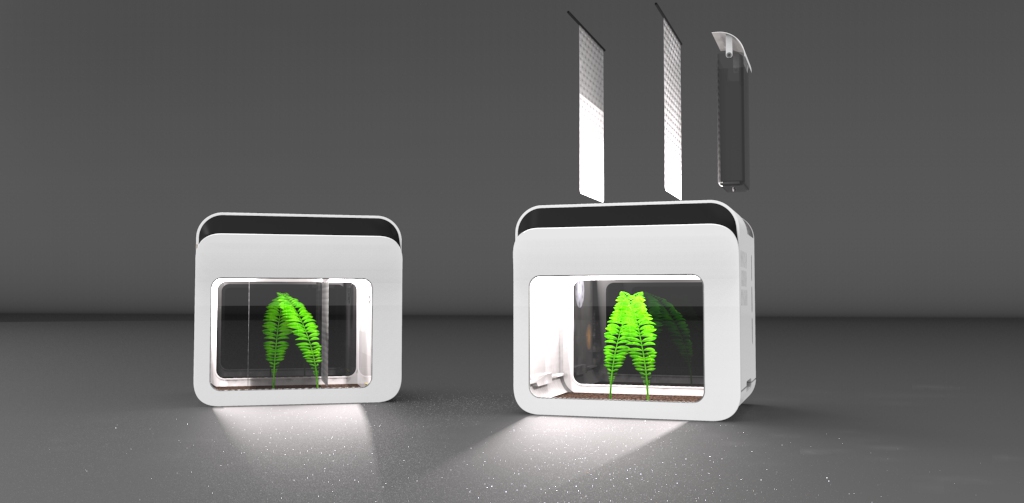
Figure 18 represents the inside of the terrarium. There will be a drain system in the soil and a watertank on the side. On the same side as the watertank, there will also be the technilogical part with all the sensors (humidity, temperature and light). In this figure are the curtains also well displayed.

7.4 Functionalities
The Escargot Nursery was expected to achieve certain functions. It had to keep the climate inside at a comfortable level for the snails. For this the humidity needed to be controlled, so a liquid spray system needed to be used to keep the soil moist, the temperature also needed to be kept within the safe range, i.e. between 15 and 25 ºC. Lighting in the form of LED also needed to be controlled to ensure the snails had enough light to thrive.
7.5 Components
In the following section, the team will explain the reasons behind the choices of materials.
7.5.1 Microcontrollers
Table 1 shows some of the controller boards which the team could use to build the prototype of the product.


The team chose Arduino Uno as the micro controller board because it blends perfectly, size, functionality and cost to suit the project. Arduino uno is very commonly used in online forums so it makes it easier for inexperienced people to use. Arduino was chosen because they use open source software which is the software requirement from the brief.
7.5.2 Sensors
The “EscarGO” needs a light sensor because the Cornu aspersum needs 16 hours of light per day. The light sensor is used to detect the ambient light level in the room and switch on a bank of LED lights if the light level gets too low In Table 2 are possible light sensors for the prototype.
| Light sensor | Power (mW) | Resistance (Ω) | Voltage (V) | Current (A) | Price (€) |
|---|---|---|---|---|---|
| LDR GL5528 | 100 | 100 | 150 | 1.5 | 0.50 |
| Analogue Ambient Light Sensor | 70 | up to 10K | 3.3 - 5 | 14 m to 21 m | 6.30 |
| ADVANCED PHOTONIX NSL 19M51 | 50 | max of 20M | >100 | max of 20 m | 0.92 |
| Luminosity Sensor Breakout - TSL2561 | 1.8 | 5K | 3 | 0.6m | 6.50 |
The team decided to use the “Luminosity Sensor Breakout - TSL2561” because it is a digital sensor and therefore easier to connect to the control system.
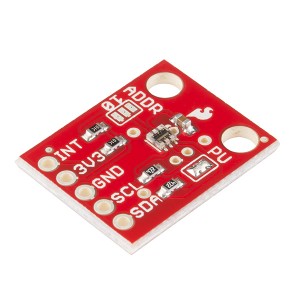
Other sensors the “EscarGO” needs, are a temperature sensor and a humidity sensor. In Table 3, 4 and 5 are the possible sensor choices.
| Temperature sensor | Voltage (V) | Current (uA) | Accuracy (°C) | Temperature range (°C) | Price (€) |
|---|---|---|---|---|---|
| LM35DZ | 4 - 30 | <60 | 0.5 | -55 to 150 | 1.85 |
| MCP9808 | 2.7 - 5.5 | 200 | 0.25 | -40 to 125 | 6.89 |
| DS18B20 | 3 - 5.5 | not given | 0.5 | –55 to 125 | 5.10 |
| Humidity sensor | Voltage (V) | Price (€) |
|---|---|---|
| Soil Moisture Sensor | 3.3 - 5 | 4.90 |
| Humidity + Temperature | Voltage (V) | Current (mA) | Accurancy | Temperature range (°C) | Humidity range (%) | Price (€) |
|---|---|---|---|---|---|---|
| DHT11 | 3-5 DC | 200 - 500 | ±5 %, ±2 °C | 0 to 50 | 20 to 90 | 4.95 |
| DHT22 | 3-5 | 2.5 | 2 - 5 %, ±0.5 °C | -40 to 80 | 0 to 100 | 9.80 |
| RHT03 | 3.3-6 | 1 - 1.5 | 2-5 %, ±0.5 °C | -40 to 80 | 0 to 10 | 14.76 |
After the team did research about the temperature and humidity sensors, the team decided to choose a humidity + temperature sensor. The team chose the DHT22 temperature and humidity sensor because it measures both humidity and temperature into one sensor which streamlines the programming and soldering of parts, and also reduces cost and encroachment into the terrarium. The DHT22 had a better range than the DHT11, so therefore was the better choice.
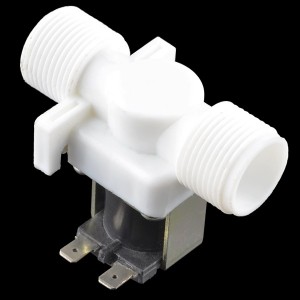
In Table 6 are water level sensors displayed which can be used to measure the water level in the water tank. If the water tank is almost empty, there will be a notification on the LCD screen.
| Waterlevel sensor | Power (W) | Resistance (mΩ) | Voltage (V) | Current (mA) | Price (€) |
|---|---|---|---|---|---|
| Water Depth Sensor | not given | not given | 3 - 5 | <20 | 3.95 |
| 10W Liquid Level Sensor | 10 | <200 | 100 | 0.5 | 6.20 |
The team decided to avoid using the water level sensor for a few reasons. The programming was going to be more time consuming and therefore the time taken for the project would be longer, and the team decided it best to use that time in other areas. There is also the cost aspect, to stay in budget there had to be some cost saving measures.
7.5.3 Heating/Cooling
For the snails to have the optimal living conditions, it is necessary to use a cooling and heating system. When the temperature reaches below 15 ºC, the heating system will switch on. If the temperature rises above 25 ºC, the fan system will turn on. Table 7 and 8 displays different heating and cooling systems.
| Heater | Power (W) | Voltage (V) | Size (mm) | Price (€) |
|---|---|---|---|---|
| DBK HP04-1/04-24 HEATER | 10 | 30 | 35 x 40 x 8.5 | 15.67 |
| Cooling fan | Power (W) | Current (A) | Voltage (DC) | Size (mm) | Noise Level (dB) | Rotation speed (RPM) | Price (€) |
|---|---|---|---|---|---|---|---|
| Fan 50 x 50 x 10 mm Sunnon | 1.32 | 0.11 | 12 | 50 x 50 x 10 | 29 | 5000 | 3.65 |
| Fan 12V 40 x 40 x 10 mm Velleman | 1.2 | 0.1 | 12 | 40 x 40 x 10 | 25 | 6000 | 3.70 |
| SUNON MC30060V2-0000-A99 Axial Fan | 0.36 | 0.072 | 5 | 30 x 30 x 6.9 | 24 | 7500 | 11.25 |
| MULTICOMP MC36256 | 0.9 | 0.18 | 5 | 40 x 40 x 10 | 27 | 5800 | 6.44 |
The team decided to use the Fan 12V 40x40x10 mm Velleman because it can be run on 12 Volts and therefore is more powerful, and is not as loud. It is also more cost effective than fans running on 5V.
7.5.4 LCD display
To know if the temperature, the humidity and the heating/cooling are optimal for the snails, the “EscarGO” needs to use an LCD-display. In table 9
| Heater | Voltage (V) | Type | Size (mm) | Price (€) |
|---|---|---|---|---|
| Display LCD 16 x 2 | 5 | parallel | 80 x 36 x 12 | 6.10 |
| ITEAD 1602 LCD Shield | 5 | parallel | 83 x 57 x 1.6 | 10.50 |
| Display LCD 16 x 2 Bot'n roll ONE A | 5 | parallel | 80 x 35 x 11 | 6.00 |
| MIDAS MCCOG21605C6W-FPTLWI | 3 - 5 | I2C | 74.2 x 25.2 x 6.3 | 10.97 |
| Display LCD 16 x 2 I2C | 5 | I2C | 80 x 36 x 12 | 8.50 |
The team decided to use the Display LCD 16 x 2 I2C from electrofun because it uses an I2C display so has less interference, also it is cheaper than the other I2C display that was found.
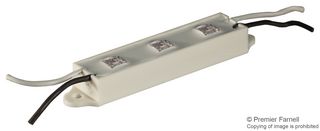
7.5.5 Lighting
“EscarGO” needs to use Lighting when the light level is too low. In table 10
| Component Name | Voltage (V) | Power (W) | Price (€) |
|---|---|---|---|
| OPTEK TECHNOLOGY OVM12F3G7 LED Strip | 12 DC | 9 | 2.96 |
| Single white LED | 2.4 - 2.7 | Not given | 0.35 |
| OPTEK TECHNOLOGY OVQ12S30W7 LED Strip | 12 DC | 1.6 | 12.86 |
| OMC FFSB1 LED Strip | 12 DC | Not given | 15.30 |
The team has chosen the “OPTEK TECHNOLOGY OVM12F3G7 LED Strip” because it is the most cost effective option and does not require as much work connect compared to using single LED's and creating a mount for them.
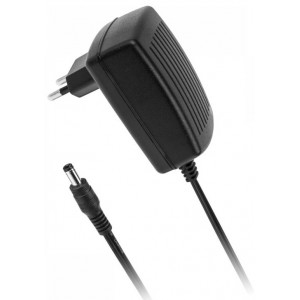
7.5.6 Power Supplies
In table 11 there are some power supply choices
| Component Name | Voltage (V) | Current (A) | Price (€) |
|---|---|---|---|
| Arduino Power Supply AC/DC 230VAC/12V 2A | 12 DC | 2 | 7.50 |
| Power Supply 230Vac/12Vdc 1,4A | 12 DC | 1.4 | 7.50 |
| Power Supply AC/DC 12V 3A | 12 DC | 3 | 8.50 |
The team decided to choose the Arduino Power Supply AC/DC 230VAC/12V 2A.
7.6 List of Materials
| Material | Price(€) | Quantiy | Source |
|---|---|---|---|
| PVC sheets | - | 3 | Abel |
| PMMA | 2.20 | 2 | http://www.acrylicsonline.com.au/shop-product/acrylic-sheet/a4-acrylic-clear-sheet-210-x-297-mm |
| Plastico Autocolante | 1.76 | 4 | http://www.mundoescolar.pt/catalogo.aspx?idcat=216 |
| Nylon mesh | - | 1 | Abel |
| Clear plastic tubing | - | 1 | Abel |
| UHU Allplast | 2.64 | 1 | http://www.moreoffice.pt/adesivos-corte-colas-diversas-cola-uhu-allplast-cola-p-9388.html |


| Total | 89.51 € |
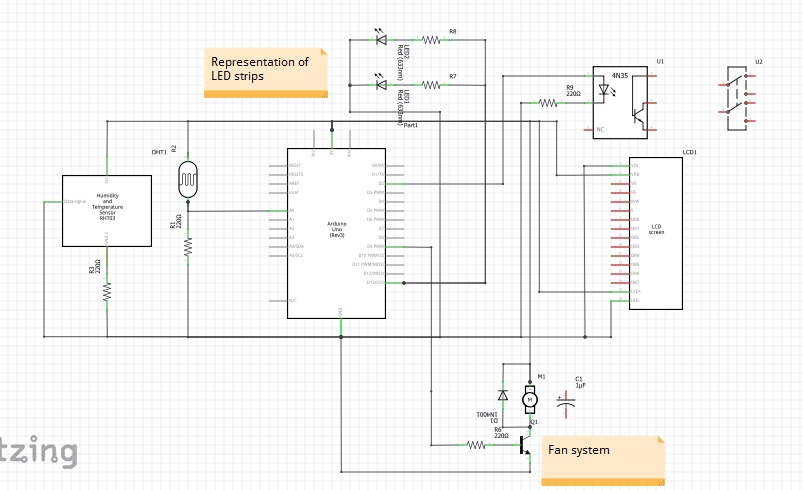
7.7 Electronic Architecture
7.8 Prototype
7.9 Tests and Results
7.10 Conclusion
Provide here the conclusions of this chapter and introduce the next chapter.
8. Conclusions
8.1 Discussion
Provide here what was achieved (related with the initial objectives) and what is missing (related with the initial objectives) of the project.
8.2 Future Development
Provide here your recommendations for future work.